|
|
| Getting started with the TDS _____________________________________________________________________ |
| David Cormie 1986 |
This document explains how to install the IBM PC/B004 version of the Transputer Development System (TDS) and how to enter, compile and run a simple occam program.
The TDS is shipped on five floppy disks, labeled system-1 to system-5. Make sure that you have at least 1.5 megabytes of free space on your hard disk.
Put system-1 into the floppy drive and close the drive door. In the root directory, type
restore a: c:\ /s
|
restore will ask you to confirm that this is the required disk (it is) and will start to copy files from floppy to hard disk, printing the filenames as it does so.
Put in system-2, system-3 and system-4 when prompted.
When this process is complete, put system-5 in the floppy drive and type
restore a: c:\ /s
|
You should now edit (using the editor supplied with your IBM) the autoexec.bat file (which is executed whenever you boot DOS) to set the DOS command search path. If there is no path command in the file you should add one, for example:
path c:\;c:\tds2dir
|
If there is a path command in the file, you should add the above pathnames to the list (separated by a semicolon).
The next thing to do is to make a new directory to contain your programs. It is recommended that each user or project should have such a separate directory. Let’s call it john; the name is not important to the TDS.
C> md john
|
Then enter it:
C> cd john
|
The TDS utilities package must now be installed in the new directory. Use the DOS copy command to do this:
C> copy \tds2dir\utility.top utility.top
|
Finally, the TDS can be run by typing
C> tds2 -t toplevel.top
|
The -t parameter is optional and causes the TDS to create a new .top file. It need not be called toplevel but the .top extension must be present. It is recommended that a new .top file is created for each application program. Typing tds2 on its own runs the TDS without creating any new files and is the usual way to start the system.
After the startup messages, the lines
Press [ENTER FOLD] to start session
...F UTILITY.TOP ...F TOPLEVEL.TOP |
will be displayed, with a flashing cursor on the second line. All operations on the TDS are carried out within an editing environment. The editor is based on the concept of folding: a fold is a line which may contain other lines. Since a fold may contain several sub-folds, each of which may contain other folds, the folding editor allows us to create a tree-like structure. Folds are used to hide the details of a program while still showing its overall structure.
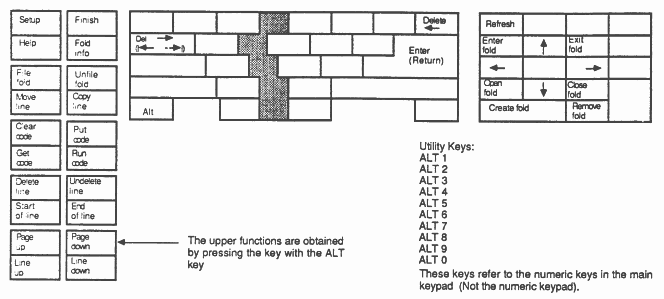
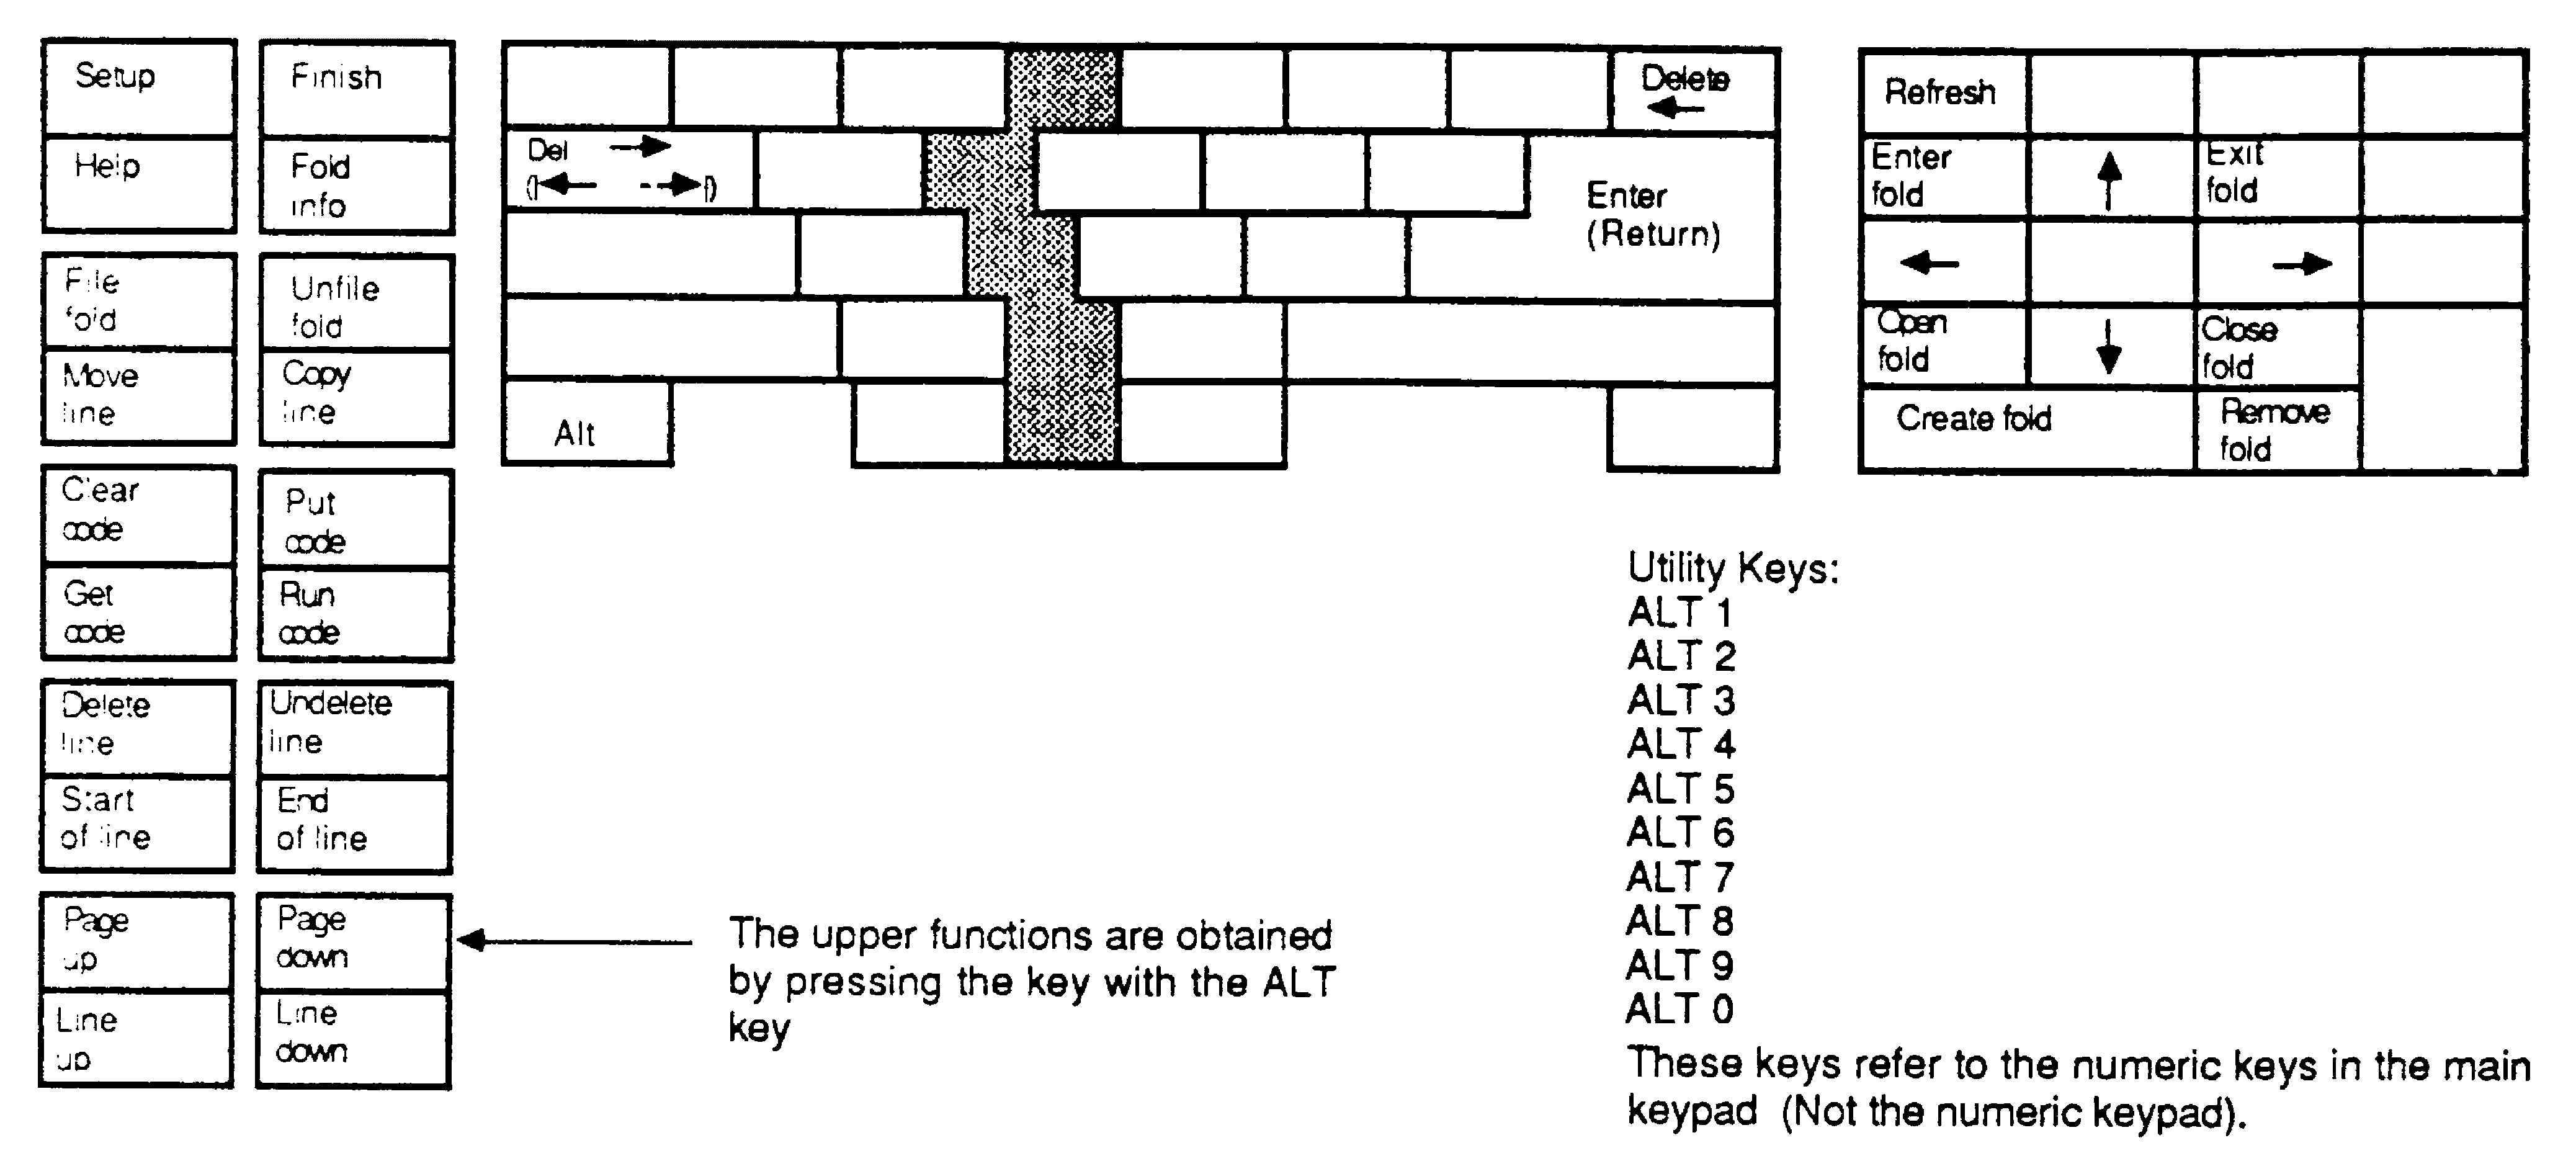
The editor is controlled with the numeric keypad and the function keys, figure 1 shows the keyboard layout. Pressing F1 will show the keyboard layout on the screen; press any key to return to the editor. Try using the 2, 4, 6 and 8 keys (on the numeric keypad) to move the cursor around. Note that the operation enter fold is attached to the 7 key on the numeric keypad. Place the cursor on the line TOPLEVEL.TOP and press 7 to enter this fold.
The lines
{{{F TOPLEVEL.TOP
}}} |
will be displayed. These two lines mark the beginning and end of the fold TOPLEVEL.TOP, there is nothing between them because the fold is empty. Place the cursor at the far left on the bottom line and type return followed by cursor up (8). Now type some text; a few lines will do. When you have finished press exit fold (9) and the display will return to
...F UTILITY.TOP
...F TOPLEVEL.TOP |
Your text is still there but it is concealed within the fold TOPLEVEL.TOP. Enter TOPLEVEL.TOP again and you should see:
{{{F TOPLEVEL.TOP
your text }}} |
Making folds is just as easy as typing in text: place the cursor at the extreme left on the first line of your text and press create fold (0 on the numeric keypad), you should see:
creating fold...
{{{F TOPLEVEL.TOP {{{ your text }}} |
The new set of opening brackets indicates the start of the new fold; you must now indicate the end of the new fold. Place the cursor below the last line of your text (only cursor moves are allowed) and press create fold again. Your text will disappear leaving:
{{{F TOPLEVEL.TOP
... }}} |
In fact, your text is now within the fold marked by ... <space><space>; all fold markers are five characters long, though the last two may be spaces. You can give this fold a name or comment by typing after the fold marker. This fold is just like TOPLEVEL.TOP: you can enter it to see its contents, and it too may contain other folds.
Folds can be removed without losing their contents. Place the cursor on the fold you have just created and press remove fold (.), the display should return to:
{{{F TOPLEVEL.TOP
your text }}} |
The text remains but the fold which you created round it has been removed.
Folds can be placed in their own disk file. Create a fold around your text and give it a name; let’s call it text fold, the name is not important but the first word should be a valid filename. It should look like this:
{{{F TOPLEVEL.TOP
... text fold }}} |
Place the cursor on the fold line and press file fold (hold down ALT and press F3): the hard disk will run and the display will change to
{{{F TOPLEVEL.TOP
...F text.tsr fold }}} |
indicating that the fold contents have been filed in the disk file text.tsr.
Lines are deleted by placing the cursor on the line to be deleted and pressing delete line (ALTF7). This is a very powerful facility because, since folds look like text lines, whole folds can be deleted in one operation; this is not the same as remove fold because it deletes the contents of the fold as well as the fold itself. Accidental deletions can be recovered by pressing undelete line (ALTF8) - provided no other operations have been performed.
Enter the fold TOPLEVEL.TOP. Make a new fold (put the cursor on the bottom line and press create folds twice) and label it hello. Enter this fold and type in the following program; adhering strictly to the indentation.
PROC hello (CHAN keyboard, screen)
VAL tt.out.str IS BYTE 8 : VAL message IS "Hello World !" : INT ANY : SEQ screen ! tt.out.str,SIZE message,message keyboard ? ANY : |
Exit the fold hello and file it (place the cursor on the fold and press ALTF3), the fold label will change to hello.tsr.
This program will write the simple message Hello World ! to the screen. The first line declares a procedure, called hello, with two channels as formal parameters.
The channels keyboard and screen are part of the environment set up for programs running on the TDS. They connect to the keyboard and screen handlers of the TDS which communicate ASCII values. The screen handler can take several different types of input, it uses the first byte it receives to identify the type of communication which follows.
Next, the constants tt.out.str and message are declared, along with an integer variable ANY.
The executable code begins with a SEQ, indicating that the statements following are to be executed sequentially. The first statement outputs the Hello World ! message to the screen handler. The message is sent as a tagged record beginning with the byte value tt.out.str which instructs the screen handler that the next item will be a string of bytes preceded by its’ length.
The last statement inputs a value from the keyboard to the variable ANY. The program will wait at this point until the input can proceed; ie until a key is pressed. This will allow you to read the Hello World ! message before returning to the TDS. The final colon defines the end of the procedure.
We now need to load the compiler utilities. Use exit fold (9) to get to the top level, ie outside TOPLEVEL.TOP. and enter the fold UTILITY.TOP. Place the cursor on the line
...F \tds2dir\5c6t4compiler.cu1 transputer compiler
|
and press GET CODE (F5) to load the compiler utilities. The utilities are attached to the ordinary numeric keys and are called by pressing an ordinary numeric key together with ALT. Press setup (ALTF1), the following should appear on the screen:
Editing parameters (press [EXIT FOLD] to finish)...
{{{ Parameter Fold ... Buffer usage ... Utilities help information }}} |
This is the session parameter buffer: it contains some useful information about the system. Enter the fold Utilities help information. A menu of the utilities currently loaded will be displayed:
1 [CHECK] - check current fold
2 [COMPILE] - compile current and nested foldsets 3 [LINK] - link EXE or UTIL fold (or SC fold) 4 [COMPILE UNIT] - compile current foldset only 5 [LOCATE ERROR] - (Not implemented) 6 [COMPILATION INFO] - display compilation information 7 [MAKE FOLDSET] - make compilation fold 8 [SEARCH] - search for text string 9 [REPLACE] - replace found text string 0 [MAKE COMMENT] - make comment fold around current fold |
To return to normal editing, press exit fold (9) twice. Utilities are applied to folds: they are used by placing the cursor on the fold on which they are to operate and pressing the appropriate utility key.
Exit from UTILITY.TOP and enter TOPLEVEL.TOP. Before we can compile the hello program, we must create an EXE fold around hello.tsr; EXE stands for EXEcutable program - a program which can be run on the TDS. Place the cursor on the fold hello.tsr and press MAKE FOLDSET (hold down ALT and press the ordinary 7 key), a fold will be displayed containing:
VAL make.foldset.type IS SC : -- SC | EXE | UTIL | PROGRAM | COMMENT
|
This is the parameter fold for the MAKE FOLDSET utility. To make an EXE fold, the SC after IS must be changed to EXE; move the cursor to the SC, delete it and type EXE in its place. Once this is done, press exit fold and an EXE fold, labeled EXE hello.tsr, will be created around hello.tsr.
The program can now be checked and compiled. Place the cursor on the fold EXE hello.tsr and press CHECK (ALT1), a fold will appear containing:
VAL usage.checking IS FALSE :
VAL range.checking IS TRUE : VAL protocol.checking IS TRUE : VAL extended.data.types IS TRUE : VAL locate.error.info IS FALSE . VAL compile.all IS FALSE : VAL force.pop.up IS FALSE : |
This is the parameter fold for the checker/compiler, none of the parameters need to be changed so press exit fold and the checker will run. If the checker finds no errors it will respond with the message:
Checked (T4) EXE hello.tsr OK
|
If an error is found, the checker will indicate it by displaying an error message and placing the cursor on the line in error; if you want to see this, try mis-typing part of the example program.
If no errors are found the program can be compiled, place the cursor on EXE hello.tsr and press COMPILE (ALT2). The compiler creates new folds within EXE hello.tsr to hold the compiled code. When compilation is complete, the compiler should respond with the message:
Code linked OK
|
The program is now ready to be run on the TDS. Place the cursor on EXE hello.tsr and press GET CODE (F5) to get the code into the user program buffer. The TDS should respond with:
Got code ok
|
Now, press RUN CODE (F6) to run the program. The program should print the message:
Hello World !
|
It then waits for a key to be pressed before returning to the TDS.
Congratulations! You have now compiled and run your first program on the TDS.
To quit the TDS, press exit fold (9) to get to the top level, then press finish (ALTF2).